JIUNGE NASI WHATSAPP TU FOLLOW. BONYEZA HAPAMyUCDavis Login: Helpful Guide to Access UC Davis Portal
MyUCDavis Login: Helpful Guide to Access UC Davis Portal Welcome to Ajiraforum.com On this Article you will Find MyUCDAVIS Login portal Helpful Guide to Access University of California,How to Reset Password Stay with us.

UC Davis Portal Login to MyUCDavis; It’s a terrific place to be at UC Davis. The portal that simplifies life for teachers, staff, and students is called MyUCDavis. You may easily log in to view your grades, a class schedule, or to sign up for classes. On MyUCDavis, you can also interact with your professors and learn about any scholarships or awards that are available for your UC Davis study.
The best part is that, as long as you have an internet connection, you can carry out all of these tasks from virtually anywhere. Sign Up & Register.
How to create your myucdavis account
- Go to the Computing Accounts Page and click Get Your UC Davis Computing Account.
- Enter your information: Full Name, ID#, and Birthday.
- Click Submit Information.
- You will be presented with an Acceptable Use Policy screen. Please read it and then choose to abide by the policy.
- If you’re unable to agree to the policy, you will be unable to create your account.
- Click Continue.
- You will begin by creating your UC Davis email address (@ucdavis.edu). If the default email address is available (first initial – middle initial – last name), you will be assigned that for your email address. If the default address is already in use, you will be given the option to select another address:
- Choose a 1-3 letter prefix and enter that information into the Prefix field. It cannot contain symbols or spaces.
- The Lastname portion will be automatically filled out, but if it is too long, it will be abbreviated to fit our naming convention.
- Please ensure you’re satisfied with your email address before clicking Continue. We do not allow email address renames unless a legal name change occurs.
- Click Continue if you’re satisfied with your email address.
- The next screen will confirm your new email address. It will take overnight to update.
- Click Continue.
- You will now create your LoginID, which will serve as your username for campus services. A default LoginID will be generated, but you can customize it. It must be between two and eight characters long and may contain letters or numbers. It cannot contain symbols or spaces.
- Click Continue.
- You will be presented with a confirmation screen for your LoginID. Please ensure you’re OK with this information. It cannot be changed later.
- Click Continue.
- You will now create your Kerberos Passphrase challenge questions and your Kerberos Passphrase.
- Choose two questions from the drop-down menus and type in your answer for each.
- You must type out your third question and the answer.
- Enter your new Passphrase and then re-enter it into the field directly below.
- A check mark will appear to the right of the passphrase fields if they match.
- You have now configured your account and Passphrase.
- If you are a student, press the Register my account button – you have successfully created your account. Skip to step 19.
- If you are an employee, the next step is to enroll in Duo Multi-factor authentication. Press the Continue button in the top area of the screen to begin. NOTE: If you do not have a second device ready to enroll, you can skip this step by pressing the Register my account button. However, you will need to visit the Computing Accounts Page to enroll in Duo before being able to access campus systems.
- You will now see the Duo enrollment window. The instructions for enrolling differ depending on the device you choose to enroll in Duo.
- Once you have completed Duo registration, you are done with the account registration process.
- You will receive a confirmation screen with your LoginID & Email Address. Your Passphrase will not be displayed or emailed to you, ever.
How to access MyUC Davis
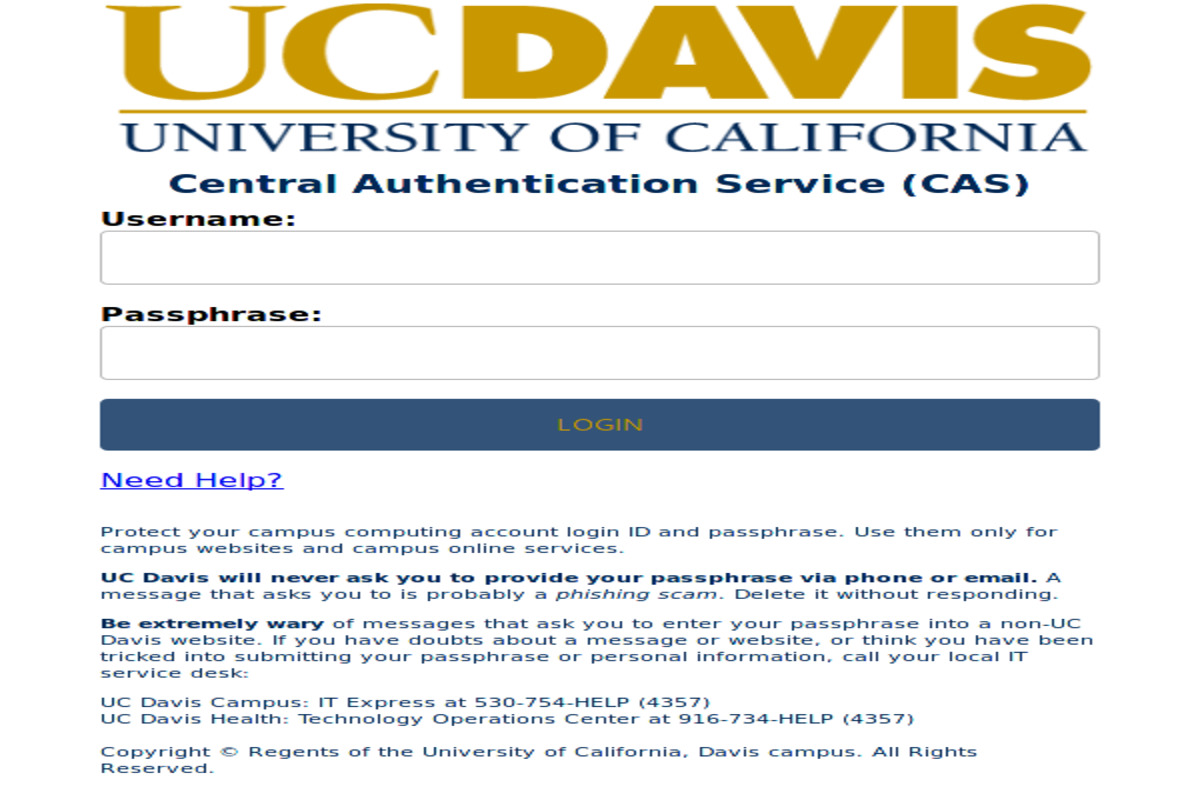
open up my.ucdavis.edu.
Select the “Sign In” button in yellow.
You’ll reach the login screen after doing this. Central Authentication Service, for example (CAS).
Enter your username on the login page.
Type in your pass phrase.
In order to access your UC Davis Portal, click the “Login” option.
How to modify the password you currently use
Click on Computing Accounts.
Click Change the password.
Type in your authentication data. It must correspond to the data kept on record by the registrar or payroll (faculty/staff) (students).
To submit information, click.
Select Kerberos Passphrase as your authorisation mechanism and enter your Kerberos LoginID.
Check that Change Passphrase For All Services is selected in the checkbox.
Then click Next.
In the Old Kerberos Passphrase area, type your current Kerberos password.
In the section labeled “New Passphrase,” type your new Kerberos password.
In the Confirm Passphrase field, enter your new Kerberos password once more.
Then click Next.
Click End Session after carefully reading the confirmation page.
Whether you were successful or not, you will often receive an email to your official @ucdavis.edu address within a few minutes. Your Passphrase will not be included in that email. If you were unable to reset your Passphrase, try a another approach.
UC Davis ConnectCARD
Students who utilize both Android and iOS devices will find UC Davis ConnectCARD to be a useful software. The free software makes it simple to keep track of everything you have in your locker and to store your UC Davis ID on your phone.
Contact the Technology Support Center at 530-752-1155 or [email protected] if you have any issues about this app.
FAQ: MyUCDavis Login
How do I access my UC Davis email?
- From any internet connected computer, go to 365.ucdavis.edu.
- Enter your full @ucdavis.edu email address and password, then click Sign in.
- You should now see your Office 365 email, calendar, etc just like you would in Microsoft Outlook.
Does your UC Davis email expire?
What is my UC Davis Kerberos ID?

Be the first to comment